One of the most frustrating yet useful aspects of digital photography, is shooting in the RAW file format. The frustrating part is that RAW files will always lack contrast, saturation and sharpening and absolutely require post-processing. This is why when you look at RAW files after downloading them that you often are disappointed in your results. The great part of shooting in the RAW format is that it maintains all the details and information that were present when you took the photo and gives you the freedom to harness this information in many creative ways. If your color or exposure is slightly off, you can make subtle changes and correct it without degrading or losing any of the details of your photo. I almost always shoot in the RAW format as it allows me to capture and post-process the shot exactly as I remember seeing it with my own eyes, however, to get to that point we have a little bit of magic post-processing dust to sprinkle over it. So lets get started.
In this post, I am going to take an image and show you how I do my RAW file processing. I typically use Lightroom 3 as my RAW processing engine, but for the sake of example and to keep the number of software requirements to a minimum, this conversion was processed using Adobe’s Camera Raw, which is perfectly suitable.
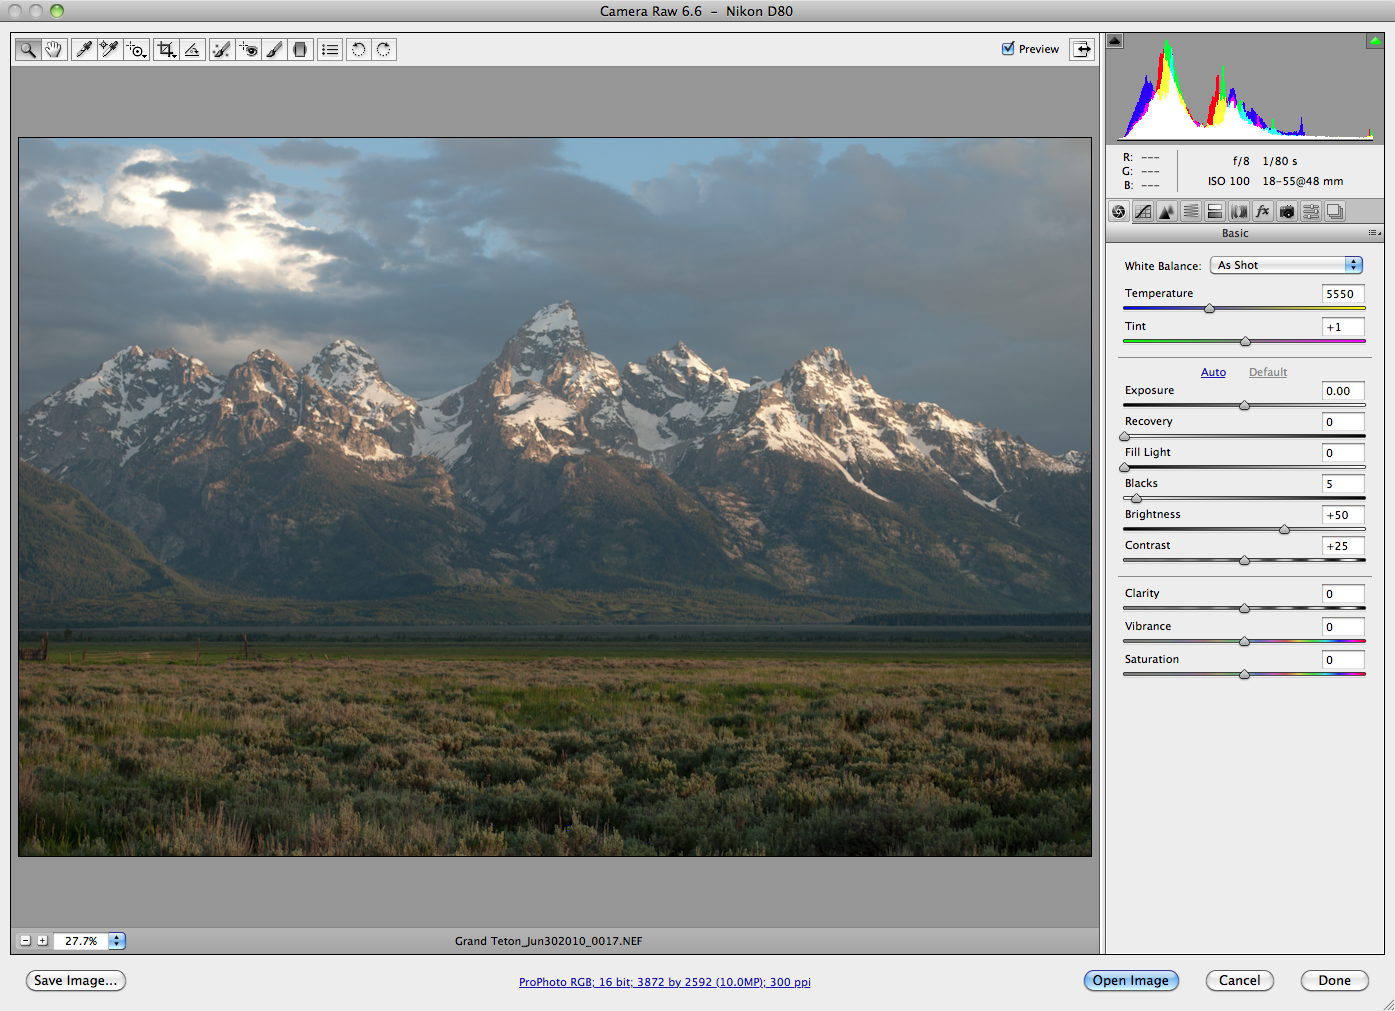
So a few years back when Shutterhogs was just an idea in the minds of a couple of friends, my fellow Shutterhog, Neal, and I took our families for a little vacation to Grand Teton National Park. Most of the trip was spent enjoying a great time with some great friends, and other than discovering that I apparently have a healthy fear of bats when they are flying around in a small enclosed room, we had one day to get out and get our photography mojo going. We set out with bloodshot eyes in the wee hours of the morning and arrived at sunrise at a great vantage point near Moulton Barn. The sunrise was not particularly amazing, but there was a nice soft wash of golden light bathing the Tetons. We got set-up, made sure the mosquitos received a healthy breakfast, and rolled off a few shots. Just a note on composition, I set up the shot dividing the frame into thirds, giving the foreground grass, the mountains and the sky each a horizontal third of the frame. Simple, yet effective. Here is the RAW file with no processing as viewed in Camera Raw.

As you can see the image is a touch underexposed and lacks some color saturation, contrast and sharpness. Now, my first step is to take a look at the image and start with the problem that bothers me the most, keeping in mind how I remember visualizing the scene with my own eyes. I remembered golden light, green grass and picturesque mountains. So my RAW processing steps will involve fixing the exposure, the contrast and the color saturation.
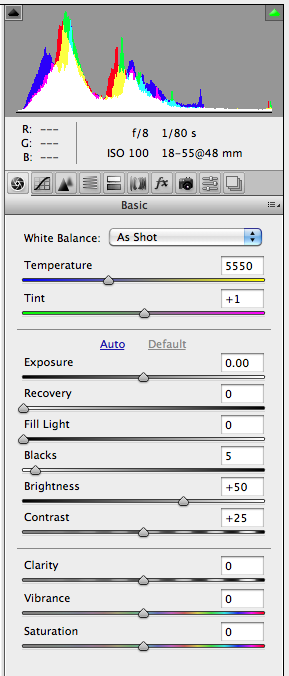
Here is the Camera Raw Basic Adjustment Panel. We are going to focus only on this panel and leave the rest of the Camera Raw functions for another time.

At first, using all these sliders and figuring out what they mean and how to use them can be a bit daunting. I always keep the mantra of adjusting the slider to what I like, and then backing of just a touch as a protective measure to not overdo it. So where do we start? I start with the problem that bothers me the most. In this case, I remembered the light being more golden and warm. So I start with my White Balance. Now you can adjust the White Balance by either using the Temperature and Tint sliders, choosing a few Camera Preset White Balance options, or using the White Balance tool in Camera Raw. I prefer the White Balance tool with some fine tuning. Simply click on the eyedropper icon at the top of the window and find an area of your photo that has a middle gray tone and click on it (See image below). This is not an exact science. I end up clicking several spots until I get what looks good to me and then I fine tune just a bit by moving the Temperature and Tint sliders just a touch in either direction. Here I found a middle gray area in the clouds and used it as my White Balance point with no further adjustments to the sliders. Presto! Warmer golden tones!

Now, the next big issue for me is the exposure and contrast. When I adjust exposure and contrast, I use the Exposure, Recovery, Fill Light and Blacks sliders but not necessarily in that order. One little trick that will help you tremendously in setting your exposure are the two little triangles in the top corners of the histogram. If you have never used these before you are really missing out. If you click on these triangles to activate them they will help you see on your photo as dark and light tones get get too dark (blue) or too light (red). This provides a guide that helps to balance the tones in your image without losing detail.

Now that the color is where I want it, I always start my RAW processing with the Blacks slider. All RAW images are very gray and muted and the best way to give it some contrast and feeling is to make sure the Black tones are expressed. I will adjust this slider until I see just a touch of clipping as represented by the blue highlighted areas. Next, I will adjust the Exposure slider until I get just to the edge of where the light tones will be clipped as represented by the red highlighted areas (See image showing clipped areas in blue and red).

It is important to note that in this image I actually chose to overexpose the area in the clouds just a touch as it does not need to contain much detail, but the overall mid-tones of the image needed a little more lightening from the increased exposure. Since I chose to overexpose, I next went to the Recovery slider and pulled it to the right to bring back just a touch of the overexposed light tones making the blown out highlights more subtle without affecting the dark tones of the image. The Recovery slider allowed me to tone down the overexposure but also keep the exposure of the mid-tones in the mountains in place. Finally, I adjusted the Fill Light slider to do exactly what it says and fill in some of the shadows of the image without affecting the highlights. I rarely ever touch the brightness and contrast sliders and usually leave them at default settings as my other adjustments accomplish what I desire more effectively.
Finally, the last thing I noticed was that the colors were not quite as vivid and warm as I remembered them so I bumped the Vibrance and the Saturation just a touch to brighten and warm things up. I love the Vibrance slider because it will only saturate colors that are not already saturated so it gives you a nice boost in color without overdoing it. The Saturation slider will boost all colors equally so less is more with this one and be careful not to overdo it. Lastly, I always bump the Clarity slider over to about 20 or so for a landscape image to bring out the details (for portraits I never exceed about 15 units of Clarity as it can give a very harsh look to the photo). See the Basic Adjustments Panel and the Before and After RAW adjustment images below to compare.

At this point I exported the image to Photoshop for some fine tuning. The only thing left that bothered me about the image was how muddy and faded the mountains looked. They were much more distinct when I was sitting there looking at them. So, I used some local contrast adjustments and a bit of dodging and burning to bring the mountains out a bit more and finished things off with a bit of overall sharpening (See Successful Sharpening-link here- post). Hopefully, this simplifies the RAW workflow for you and gives you a little RAW processing confidence with a side of know how. Here is the final photo edit post-Photoshop below (Don’t worry we will cover the Photoshop stuff in later posts).
This is the majestic scene I remember while I was standing there feeding the mosquitos! At least before the light headedness started from the overall loss of blood.
-Alex


by awsmith
Thanks for posting! Easy to follow and understand. Thanks!